Showing posts with label upcycled decor. Show all posts

The Vintage Traveler Tablescape

Let's go on an Adventure- with a vintage suitcase, ceramic birds and more stunning vintage items to create a beautiful vintage travel inspired tablescape! I am using the same dishes, glasses and silverware that you have seen in my previous tablescape posts to show you how versatile dishes can be used to create so many unique themes.  


I picked up this vintage suitcase at Goodwill and even though it is avacado green, when paired with the right decor looks fabulous!  I always like to layer the centerpieces to add height as well as texture. The first layer of the centerpiece is the cloth tablecloth.  Next, the suitcase, then another layer of fabric and finally the bird cage with the ceramic bird.  I also added the vintage salt and pepper shaker to the top of of the suitcase to add a different layer of height.  This centerpiece is a great way to seamlessly mix old and new decor to create something beautiful.  


I love how the gold trim and the silver on the luggage and silverware look together.  These rose plates with the fold trim are some of my favorite pieces.  I actually have 12 plates but of course I never put the same ones on the table together.  Each plate on the table has a crochet doily underneath and they are all different as well.  I try to add many textured fabric pieces to my tablescapes and many layers. 

      
I decided to place the napkins to the right of each place setting instead of in between the salad and dinner plate like I usually do.  These blue thumbprint goblets are heavy and perfect for any beverage. 

I have so many of these vintage hankies and they are just so pretty.  I picked ones with pink and blue to place on top of the suitcase to make it more feminine. The salt and pepper shakers are super cute! 


The avacado green water glasses and candy dish add to the color theme. 


Take a peek way down at the end of the table where you can see the coral candy dish with lid! 


No two plates on the table match.  I played with different combinations of salad and dinner plates 


Next time you are setting a table for a gathering, mix and match different pieces even if they are not vintage.  Centerpieces don't always have to be flowers and candles.  Look around your house to find something unique for the centerpiece and start from there!  


 Start Small- Great Design Takes Time- Enjoy! 


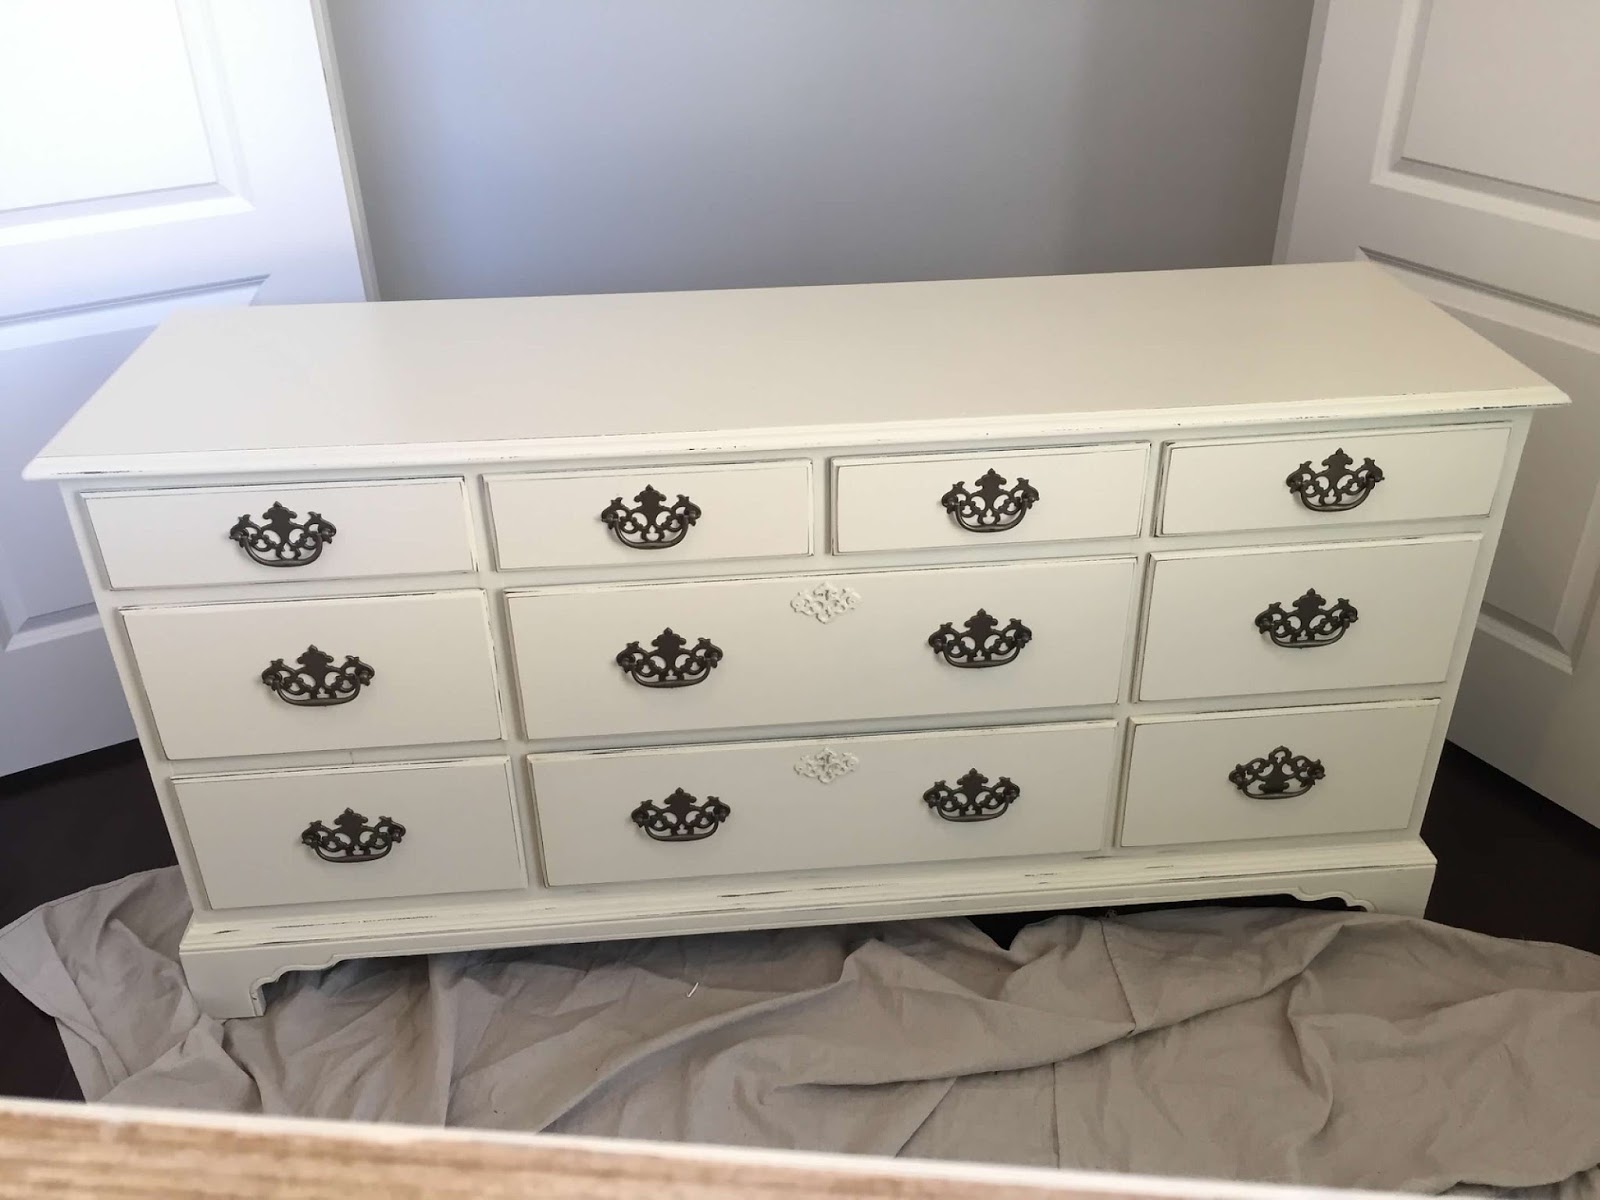
The Perfect Pair Dresser and Hutch Furniture Makeover

These two pieces met for the first time and were a match made in Heaven! The dresser is from a family friend and the hutch belongs to the buffet I'm using in the foyer. Once these two were painted and attached, they will spend eternity together! 
  

I have had the vision of these two pieces together for years and finally decided it was time to make it happen. The dresser is a vintage solid piece from Drexel with dovetail joints and solid wood construction.  The hutch belongs to the china buffet I'm using in the foyer entrance. Together, they both offer ample storage for our office closet to hold all of my crafting supplies. Here is how they both came together and are a perfect match! 


My friend Wendi introduced me to a brand new furniture paint from General Finishes and I must say it is my new favorite paint.  It goes on smooth as butter and provides a great finish.  I painted each piece of furniture with one coat of primer and then two coats of the General Finishes Milk Paint in Antique White.  


Once finished painting the dresser, I spray painted the handles dark bronze and used my hand sander to distress the edges of the drawers. I wanted a small amount of distressing on this piece to give it a high end look.  

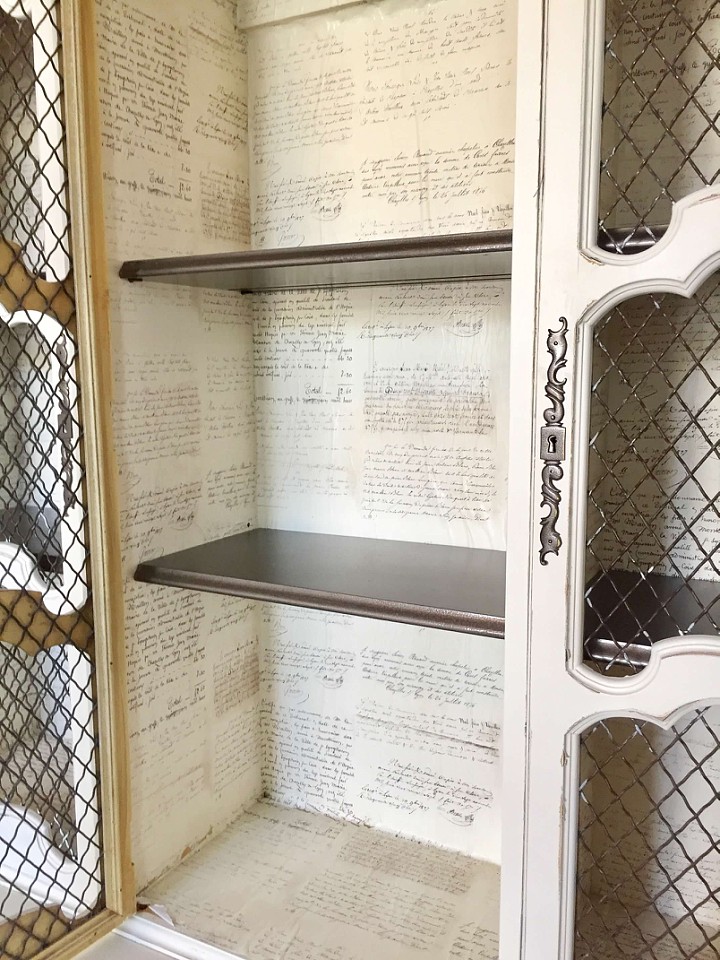
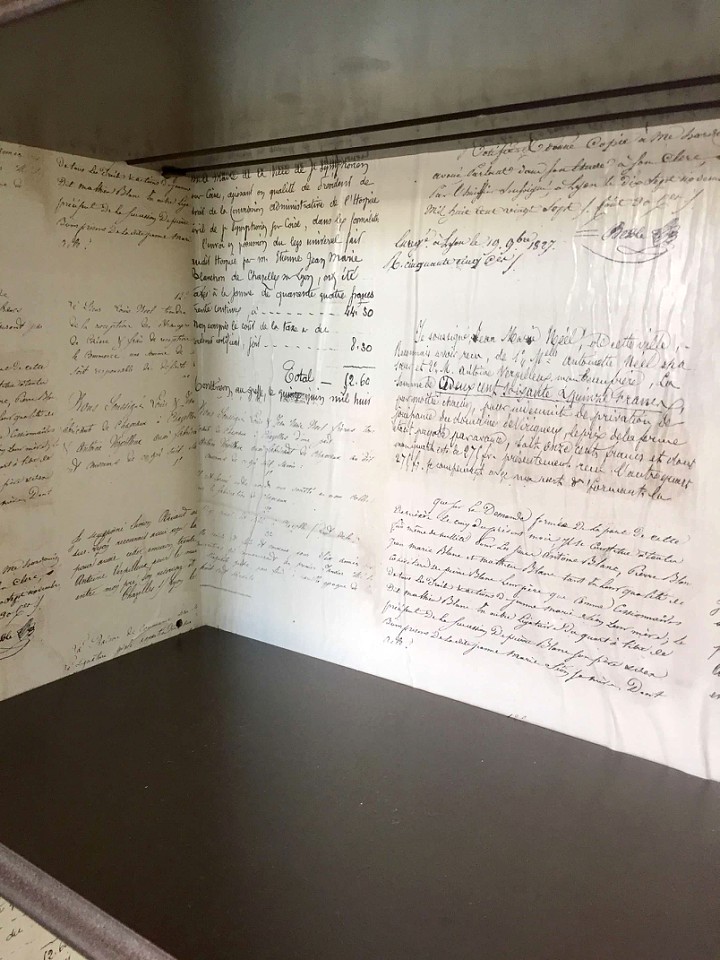
Next, I took some wrapping paper I purchased from Ballard Designs and Mod Podged the entire inside of the upper cabinet.  Since the doors were made with chicken wire, I wanted something you could see and would stand out. I then spray painted the shelves with the same spray paint as I used on the drawer pulls. 


Once both pieces were painted, I used a spray satin Polycrylic over both pieces for protection.  I attached L brackets to the back to secure both pieces and they are now one! 


While I would love to put this piece somewhere out in the house, I really needed it for storage in the office closet and the size is perfect.  When we built our house, I did not get any shelving in any closet and this is not only beautiful, it provides ample space for all of my crafting supplies.  I can always take it out of the closet and use it around the house if needed.  


Start Small- Great Design Takes Time- Enjoy!!

Authentic Colonial 5 Panel Door Turned Unique Jewelry and Accessory Holder!

THIS MIGHT BE MY FAVORITE DIY PROJECT EVER!

This project all started with this old 5 panel colonial door from Georgia.  It smelled a wee bit like mold and when my friend Linda drove it home for me in her van she gagged the whole way lol.  While this beauty sat in the garage, I collect old knobs and pulls as well as new glass knobs from Hobby Lobby! I took it over to my dad's and let it air out in his workshop for a few months! 


Then the girls and I came over and worked our magic.  First, I sanded to get it nice and smooth.  I counted 5 layers of paint. Imagine all the history that door has been through.  After sanding, I mixed a few colors of paint together until the perfect shade was achieved and then the painting began. In all,we painted two coats.  


We let it dry for a few hours, did some nice distressing (seen in the final product) and then back in the car she goes to get her bling put on at the house.  I didn't have any plan where the knobs and handles would go, just thought I'd decide as we were hanging them.  


Ta Daa!  This is how it turned out! I wish the picture was bigger but since the door was so tall, I wanted to get all of it in there.  

A nice up close shot of this beautiful piece.  I hung a lot of the hooks at different angles for different lengths of necklaces and other items.  That knob on the left holds rings. The great thing about this holder is that it is a nice solid wood door and it leans against the wall and is completely mobile! I can also add more hooks and knobs are needed if my collection gets too big! 


Have you guys ever made your own jewelry holder?  I'd love to hear about it and what are your thoughts on this one?


START SMALL, GREAT DESIGN TAKES TIME- ENJOY! 


$6 ThriftStore Vintage Book Makeover

VINTAGE BOOKS LOOK GREAT WITH THE COVERS OFF! 

A quick trip to Village Thrift in Winter Springs on Saturday resulted in the purchase of three $2 hard back books. I saw the idea in the first model home tour I wrote about last week and thought it was a nice simple look. I already used vintage books around the house but did not want to take those covers off because they belonged to my grandmother. I found these great books and as careful as I could took off the covers.  


I then added some twine around them and knew the perfect spot would be on the foyer table I just finished a few weeks ago. Three books was too high and two books was just perfect.  


Start Small- Great Design Takes Time- Enjoy! 

$20 Brass Chandelier Turned Foyer Beauty!

BRASS LIGHT TURNED OUT TO BE THE PERFECT FOYER CHANDELIER

I often shop at the local Habitat for Humanity Restore. We have several of them throughout the Orlando area. Last year I found this light for $20. One problem thought is that it was old, ugly, brass and has broken and missing candle sleeves.  

I decided to use the best spray paint on the planet, Rust-Oleum. I love this paint because of the wide variety of colors that it comes in as well as the ease with the nozzle. It is like you are using a paint sprayer and the coverage is wonderful. I took the glass out and the top off and painted each section with the flat soft iron finish. I ordered new black plastic candle sleeves off Amazon and purchased 40 watt frosted bulbs.  The light is a whopping three feet tall and 23 pounds so it was a little bit of a job hanging it from the 12 foot ceilings.  

Once the light was installed, the height and the shape and the finish matched perfect in the foyer and it looks like brand new!  It just took a little time and patience but the savings was worth it! 

Start Small- Great Design Takes Time- Enjoy!


Free Cotton Branches + $2 Goodwill Vase = New Decor In My Family Room

THINGS ALWAYS HAPPEN FOR A REASON! 

A few months ago I was looking on line and really wanted to purchase so cotton branches and a vase.  I love the simplistic look of branches and saw the idea in a magazine.  The website www.saveoncrafts.com has great prices on them, the lowest I have seen but I just never ordered them.  

Last week I went to a real estate styling appointment and as soon as I pull up in the driveway (in the county), I see a huge pile of cotton branches in the trash can!  It was almost like WOW this is so cool!  After meeting the clients I asked if I could have them and they helped me put them in the car!  The homeowner has an antique market in Oviedo, FL, and these weren't selling so she brought them home to discard.  Her home was filled with so many neat rustic items and they were such a nice family!  


I brought all of the branches home and they stayed in the garage for a little while. 


I then found this glass milk bottle vase at Goodwill for $2 and I knew it would be perfect for those branches!


I took off the rope on the bottle and added the twine.  I picked through each branch to find the perfect ones and now this $2 arrangement sits in front of the scrabble board I made last week!  


Start Small- Great Design Takes Time- Enjoy! 


Family Scrabble Board Upcycled Wall Art


FAMILY SCRABBLE WALL ART

Over the weekend I added the personalized monogram wall art to the foyer. This frame used to have a burlap cover with a black "S" in the middle. Since it was on the same wall as the monogramed print it looked weird to have a frame with an "S next to it. I have been wanting to create a personalized scrabble wall art for a while now.  I added the same Ballard Designs French Script Paper and began with the family name "Smith" in the middle.  I added family names, places we visited and positive words to make it complete!  What I really LOVE is that I can take it down and add to it as needed!  I ordered the Scrabble pieces from Amazon and have tons left over!


Start Small- Great Design Takes Time- Enjoy!
$6 Goodwill Upcycled Personalized Wall Art


YOU WILL NOT BELIEVE HOW THIS $6 PAINTING TURNED INTO A BEAUTIFUL PERSONALIZED ART PIECE!


I was shopping at Goodwill back in January and saw this piece of art.  At first you might think, wow this is awful, but I knew eventually it would turn into something great!  The price was only $6 and it was super heavy and a custom piece based on the paper and staples on the back. I bought it and it sat in my garage for months.  


I was rummaging around the garage looking for something and stumbled on two items that you will shortly read about. Then I got the idea in my head how I wanted to transform this art piece and where exactly to put it in my home.  I started out by using my favorite flat black Rustoleum spray paint and painted the frame as well as the painting on the inside.  


Once the paint was finished, I used this roll of French Script wrapping paper from Ballard Designs.  It was on clearance about 2 years ago so I gobbled up 5 rolls not knowing what I would use it for.  
 

I rolled it out and used spray tacky glue and an Exacto Knife to trim the edges.  


Apparently I ordered this monogram vinyl from Jane some time ago and forgot about it. So I carefully rolled it out on the frame and it barely fit! I did a little trimming on the K on the bottom right but that does not take away from the look of the art. There we have it.  The S in the middle is my last name of Smith and the J on the left is for hubby Joel and daughter Jordyn and the K on the right is for me, Kelly and daughter Kaitlyn. I then hung it in the foyer and it looks so good! Can't wait to finish the foyer so I can take a photo and post it!  


Start Small, Great Design takes time- Enjoy!


Antique Window, Vintage China Hutch and Reclaimed Barn Wood FoyerProject

This entire project started with an empty foyer, a large china hutch and an old window.  My original plan was to only have a hutch in the foyer and paint and wallpaper the inside. When I purchased it, it was very light gray with silver handles.  Once I put it in the foyer it was just too tall and bulky.  

I then got this window off of the local neighborhood Facebook buy, sell, trade site.  Now to decide what to do with these to pieces to make the foyer what I wanted it to be.  I loved the window just the way it was and only cleaned it off and wiped down the glass.  I took the top hutch part off so it could become a buffet and look at the next photo to see what happened.  
When I took the top off. this large open area was now showing, so what is a girl to do?  I have always been a girl to use chalk finish paint and roll it on but with this many nooks and crannies and the fact that I am a little impatient, I decided to use a satin spray paint.  This is the ONLY spray paint I use. It sprays so soft and smooth and even.  This came in a satin finish but I knew once I was finished distressing and sanding it would look just as good as pieces I have painted with chalk finish paint.  

All done painting, just got a little on the grass. LOL. This only took two cans of paint, mainly because the buffet was already a light gray.  


Woah!  The finished product already!  I'll guide you through each piece and where they came from and why I placed them where I did. 
1.  I first centered the painted buffet where I wanted it. When doing a wall arrangement, always place your furniture first and then work your wall pieces around it.  You can see I placed the arrangement a little larger than the buffet itself. 

2.  I then took scraps of reclaimed barn wood and made a design to cover the open holes made by the missing hutch top.  The reclaimed wood was $1 each and I also used it in the restroom sign above a door in our house, these are the missing pieces so all that wood cost me about $3.  
3.  I bought the large candle holder at Goodwill, it is from Party Lite and only cost $6.  I sprayed it with the same white paint and then distressed it with sandpaper.  

4.  I used another smaller piece of the reclaimed wood and placed the three small mason jar candles on it with battery operated votives.

5.  The greenery ball and the burlap jar did not come together.  I purchased them from Goodwill on separate occasions.  Notice how I grouped everything in the middle and there are varying heights.  It took me a few times of arranging things to get this composition but I totally love it.  

4.  The welcome sign to the right is from one of my favorite new stores.  You can find the welcome sign and so many vintage replicas and found items at www.bits of vintage.com (click HERE to be taken directly to the store) or click the Bits of Vintage Photo on the left of the website).


5.  I just added picture hangers to the back of the window and it is such a statement piece!

6.  The beautiful sign is from www.smallwoodhome.com. and you can get it HERE She has a large variety of wooden signs for very reasonable prices and shipping is so reasonable.   I loved the meaning of this piece and people can read it as soon as the enter my home.  

7.  The last piece is an old tin wall hanging from Southern Living at Home.  It originally came brown but I painted it with the same white paint and added antique wax and distressed it with sandpaper until I was happy with the look.  

I have the darker black pieces on the outside and then the handles of the buffet are black.  Everything else is white or off white.  I arranged the pieces on the floor until I found a composition arrangement that I thought looked great!
This is the 6.00 Party Lite candle holder from Goodwill. The flameless candle on the inside is from QVC. I have these flameless candle all over the house and what I love about them is that thy flicker like a real flame and they are on timers. 
Notice the reclaimed wood that the mason jar candle votives are sitting on has a darker tone, this is the leftover scrap wood from the restroom sign.  You can read about that creation HERE.

Start small, great design takes time, Enjoy!